Level Design:
Full production
On-Boarding:
We needed to figure out what the best method would be for on-boarding new team members. We knew we would be getting an additional nine team members, bringing us to a total of thirteen people on Little Lizard Studio’s development team. We now had 2 Programmers, 2 Producers, 3 artists, and 6 designers. The four original team members had been promoted to leads in their discipline which meant we had two lead designers and two lead artists. For the sake of representing other roles we appointed a lead programmer and producer. We were fortunate enough to be able to select team members who’s specialties played to Visualizer’s strengths rather well. With the large team size of thirteen, we decided to delegate ourselves into strike teams. These teams consisted of art, systems design, level design, feedback (SFX, VFX, and UI) , and general programming. This encompassed all members on the team and gave each person a defined role. Each strike team was lead by one of the 6 leads, with the exception being that the two lead artists leading the art strike team together. This allowed us to assign tasks easily and focus on certain areas of development that were in need of assistance.
With Simon heading the systems strike team and dedicated talent on audio production/programming, it meant that I would be able to focus much more on Visualizer’s level design and game loop. In order to keep strike teams from becoming too isolated from one another, we held weekly lead meetings. Here the leads would update one another on the happenings within their respective strike teams, discuss the current state of the game, and what needed to get done to reach our next milestone.
While this all sounded great, I still made sure to be as involved with the overall production as possible and not become to entrenched in my level design duties. A large part of my job in the vertical slice development phase was running public playtests for Visualizer. This allowed me to watch the game progress each week and quickly identify areas that needed to be addressed. With this responsibility being taken off my shoulders as well, I became a bit nervous that we would lose that “watchful” eye on our game. I was particularly worried as this has happened with a few other projects I have worked on with team sizes of roughly 5-9 people; much smaller than the size of Little Lizard Studios. Because of this, I tried to stay as proactive as I could with keeping on top of the team and the game’s development as a whole in order to avoid the project flopping.
A New Direction:
A new team meant a new scope. As such, we spent the first few weeks of the productions listening to the feedback of our new members and discussing where we all wanted to take Visualizer. We ended up deciding we wanted to revamp the existing two levels and turn them into a full fledged campaign mode; finishing with a boss fight. Supplementing this, we also wanted to create an endless mode. In terms of systems design, we wanted to expand from 2 weapons to 5 and from 3 enemies to 6 (including the boss). We also wanted to scrap the combo system in favor a currency system that awards the player “bytes” for performing certain actions. Additionally we chose to remove the AoE blast ability and replace it with a powerful melee. On top of this we converted the player abilities to be on a simple timed cool down rather than being tied with the no-longer existing combo system.

A sketch of our NEW level 1

A sketch of our NEW level 2
In these early meetings, we discussed integrating our enemy spawns with a nest behavior to give us level designers more control over the flow and pacing of a level. We figured this would also help give the sense that the “ghost frequencies” are infecting and invading club dSync. In tandem with this, we designed a basic corruption system that would spread throughout the level over time. This would allow us to create a modifiable level design that would morph and change throughout the length of play; almost feeling like the level is alive. The idea was that this would sell the feeling of the club being overrun by the “ghost frequencies’” boss.
We ultimately settled on five campaign levels, each with progressively more corruption than the last. The final level was to be entirely corrupt as this is where the final boss resides. We wanted the corruption to be an integral part of the game experience, using it as a means to block off certain areas of the level or used as an obstacle that will require the player to think creatively about how to navigate around it. We wanted to tie nests to the corruption to make it clear to players that the two were directly correlated. We tied them together in the sense that if a player destroys a nest, the corruption in the vicinity around it will also be destroyed. In addition to this, we used the nests and other areas of static corruption as spawn points for the non-static, spreading corruption that overtakes the level. Since we did not want to inhibit the player’s movement too much, I developed a destruction mechanic that allows players destroy any object we want them to, in this case, corruption:
This destruction mechanic was so satisfying and worked so well with the feeling of the game that, over time it had come to signify the player’s progression. During the tail end of vertical slice development, it became obvious that Visualizer’s game loop was suffering and this destruction system was the perfect way to let it shine in a unique and intuitive way. When we updated our tutorial with fresh new walls and new checklists, I decided to forgo the play button entirely in favor of having the player shoot and destroy the walls in the tutorial after completing each checklist.
The Gameloop:
Additionally, during vertical slice development, we had quite a bit of trouble getting players to find and shoot the play button to start each level. We tried everything from using particle effects and even animating it. Eventually I decided it was not worth the effort to push this mechanic so hard if we were getting diminishing returns. Instead, I decided to refactor our elevator and play button into a more streamlined gameloop. Previously, players in the elevator were asked to press the enter key to go to the next floor. Once on the next floor, they would then have to shoot the play button to start the level. This ended up taking too long and was often confusing to players which broke the flow of the game. I instead chose to modify the elevator to lock the doors behind the player upon entering a new room and starting the level after a short delay. In addition to this, I eliminated the need for a second elevator by simply asking players to return to the same elevator in which they came from in order to progress. Perhaps the most interesting change in gameloop however is the implementation of panels into the elevator. With five levels, a hub, a tutorial, and an endless mode, there were a lot of places for a player to go. Wanting to reduce the amount of UI menus and navigation the player is required to do, I set up as system that manages levels directly from the elevator during play. If the player shoots one of the eight panels, it shatters and takes the player to the corresponding level. Any panels that correspond to a level the player does not currently have access too will be deactivate and the player will not be able to shoot them. This system helps streamline Visualizer’s gameloop and makes it very easy for players to intuitively understand how to progress and play.

Continuing the pink = shoot motif carried over from the old play buttons, the panels in the elevator are neon pink
I also felt as though the transition from tutorial immediately into the campaign mode with no period of rest was a bit overwhelming for new players. Therefore, I instead created a hub level which the player would be taken to upon completing the tutorial. I limit the use of the elevator panels to just the “Hub” button in the tutorial as to teach the player how to use the elevator. Upon spawning in the hub, the player can choose to stay in the hub and visit one of the shooting galleries. Each gallery is set up with re-spawning training dummies that the player can practice shooting using the five different weapons in an area completely devoid of danger. Once the player is satiated with this, they may again enter the elevator and choose to begin either the endless mode or the campaign.

An overview of the Hub blockout.

An interior view of the preliminary Hub blockout.
With the new gameloop and game modes decided, we needed to figure out how to split the level design work in the most effective manner. Initially both myself and Jacob Olsen (my other level designer) began working on the campaign levels as a duo. We had worked out a level progression for each subsequent level in terms of which enemies will be introduced when and what the challenge or puzzle is for each level.
However, we quickly realized that with our initial plans for the endless mode, we needed to start right away so we would have time for balance and iteration. As we fleshed out our plans for the endless mode more and more it quickly became a very involved and complex game mode so I jumped at the opportunity to work on it.
To see the endless mode final product in action, check out my reel below:
The Endless Mode:
In the early planning stages for endless mode, we knew we wanted the mode to focus primarily on wave based combat. We wanted to create a space where the player would be able to use our upgrade machine to experiment with different weapons and weapon upgrades to give the player a space to carve out their own unique style of play. We wanted each consecutive wave to ramp up in difficulty to test the player’s skill and proficiency with different weapons and upgrades.

Initial sketches and size comparisons for the tutorial, hub, and endless mode. Progressing to endless mode from the start of the game is as follows:
Tutorial —> Hub —> Elevator —> Endless mode
With the basic concept of endless mode decided, we conducted a few meetings with both the level and systems design teams to iron out a more concrete vision for the gamemode, which called for a few big changes. We concluded that we would need to modify our spreading corruption system to have built in randomization functionality. This would allow it to no longer require a pre-placed spline to spread along. Instead corruption would spread semi-randomly and would contribute to making every play session in endless mode feel unique. Additionally, we wanted the main method for enemy spawning in endless mode to be driven by corruption. This would require a bit of retooling on the enemy spawning side of things as well. By this point with all of the changes we had discussed as a team and with a number of different ideas being thrown around, I could tell that members of my team were already starting to get a bit lost. To minimize confusion and give everyone working on endless mode a reference point to make tasks from, I created a flowchart that outlines all of the functionality in endless mode.
Green bubble = Start of flowchart
Unfortunately we had to cut certain elements of this spread sheet due to time constraints. The biggest change being that we removed the nest mechanic entirely. The original intention was to have the mega nest create “special” nests containing only our difficult enemies so that the player would then need to destroy these special nests to stop these enemies from spawning. The intention was that this would give the player a bit more control and agency over the pacing of play. We instead simply drove all enemy spawning from from corruption and adjusted the enemy spawns to account for this change.
In addition to these major changes we removed a few smaller details as well. The first of these changes was deciding to not check to see if the player finished a wave before the song ended. This meant we also did not buff the enemies that remained after a song looped. The second minor change was related to the interaction between story and endless modes. We decided that while we wanted to include progression elements in endless mode, we did not want to lock off certain areas or upgrades to the player behind certain game modes/milestones. We decided that while this might be a nice touch for the full version of the game, it would make showing our work to audiences a bit more tedious.
We were however, very careful to build in a “lull” period between songs so the player would have time to explore, clear corruption, and use the weapon upgrade machine. Additionally since we chose to require players to find weapons throughout the level, we did not give the player the ability to advance to the next level from within the upgrade machine. We instead opted to simply play the next song after a short delay. During this delay we included a simple trick to maintain gameplay tension in our music track. The music featured between waves features what is known as a “Shepard’s tone” which is an auditory illusion that makes it sound as though the song in endlessly increasing in tension. This prevented the time between waves from feeling too relaxing and gave the player more of a sense of urgency.
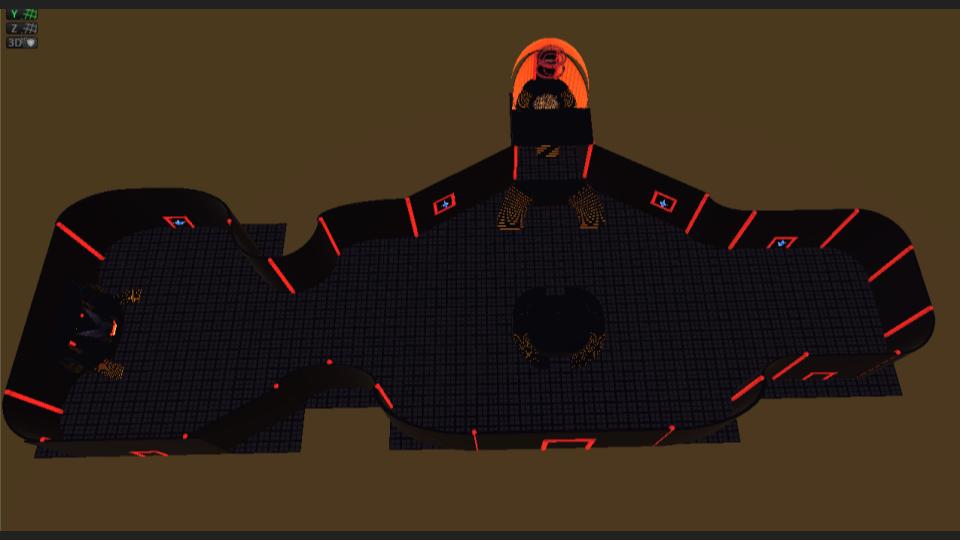
Endless mode main room.
Realizing that this gamemode would be a significant time investment on both the level and system design side of things, I needed to create an efficient and flexible workflow for my team. The plan was to block out the main room in accordance to the earlier sketches I had done. I wanted to get this room entirely finished before touching any of the side rooms so the systems and audio teams had a space to prototype and test things. This would allow us to work on the balance and iteration of our corruption/enemy spawn behavior as we finalized the level design of our additional four side rooms.
With the main room complete, I passed it off the the systems team as I continued creating and populating the four additional side rooms complete with environment assets, jump nodes, and navmeshes.

Over view of all of endless mode.
Despite having a save system in place that tracks the levels the player has completed, which guns they have unlocked, and how many “bytes” they earned, I chose to localize the endless mode progression to just that game mode. The progression system I chose to use in endless mode instead was a system of purchasing doors similar to the likes of “Call of Duty’s” “Zombies” mode. Each door the player purchases and gives them access to new areas containing more health, damage, shield, and weapon pickups. Purchasing a door causes the remaining doors to go up in price to accommodate for the amount of bytes the player is earning in each wave.
I wanted the flow of the endless mode level to be cyclical since the player would be constantly on the run from enemies and corruption. While the player has the ability to destroy this corruption and fight back against enemy spawning, they will eventually need to move to a different room or else risk becoming overwhelmed. The addition of purchasable side rooms helped players gain more control over the battle as it gave them more room to maneuver.

The systems team and I modified the pick up spawns to help with this. We now had the option to control a pickup’s spawn rate, incrementally increasing its timer each time the player collects it. Health is the most precious resource in endless mode as the player will eventually become worn down and overrun by enemies. Because the timers on certain health pickups increase on use, the player has to use them very carefully and purposefully in order to preserve them as long as possible. To help make gameplay even more varied between play sessions, we included the ability to randomize a pool of specified pickups. This meant the player never knew where a health pick up would be (aside from a few purposefully placed ones) and this would encourage exploration of the level.
The primary reason players would want to explore the level however was the ability to unlock additional weapons, as the player only starts with the pistol. The systems team created special weapon pick ups that allowed the player to unlock a new weapons when collected. I placed one of these pick ups in each side room to both incentivize and reward player exploration.
With the sheer size of the endless mode being larger than our five campaign levels combined, we were rather worried about performance issues. This was especially true considering that we planned to continually spawn corruption and enemies. To help combat this a bit I split the endless mode into five separate scenes, each containing one room, as shown below:

From here, I created a system that deactivated the hub area and additively loaded in each of the five endless mode scenes into the hub level. This helped to drastically cut down on loading times. We then utilized an occlusion culling system to selectively render out anything that was not in the camera’s view. This was our main defense against performance issues.
Splitting up the endless mode into five unique scenes also posed a dilemma in terms of AI navigation. We used a navmesh to control all enemy movement and as such would need to be baked into each scene ahead of time. I initially toyed around with the idea of baking the navmesh before splitting up the level. However, for the sake of future level iterations, I opted to go with a different solution as the navmesh would have to be re-baked every time I made a change in a room. Because of this, I decided to bake the navmesh separately in each of the five scenes and use carefully placed jump nodes to allow the AI to travel between rooms once spawned. To my surprise this works almost flawlessly, with the transition between rooms only being noticeable to the if one looks for it.